When launching MATLAB, the first thing to do is check the MATLAB desktop, which consists of tools for managing files, variables, related applications, and several utilities. The desktop appearance upon the first launch of MATLAB is shown in Figure 1-1. The desktop appearance can be customized, including moving, resizing, and closing tool windows, etc.
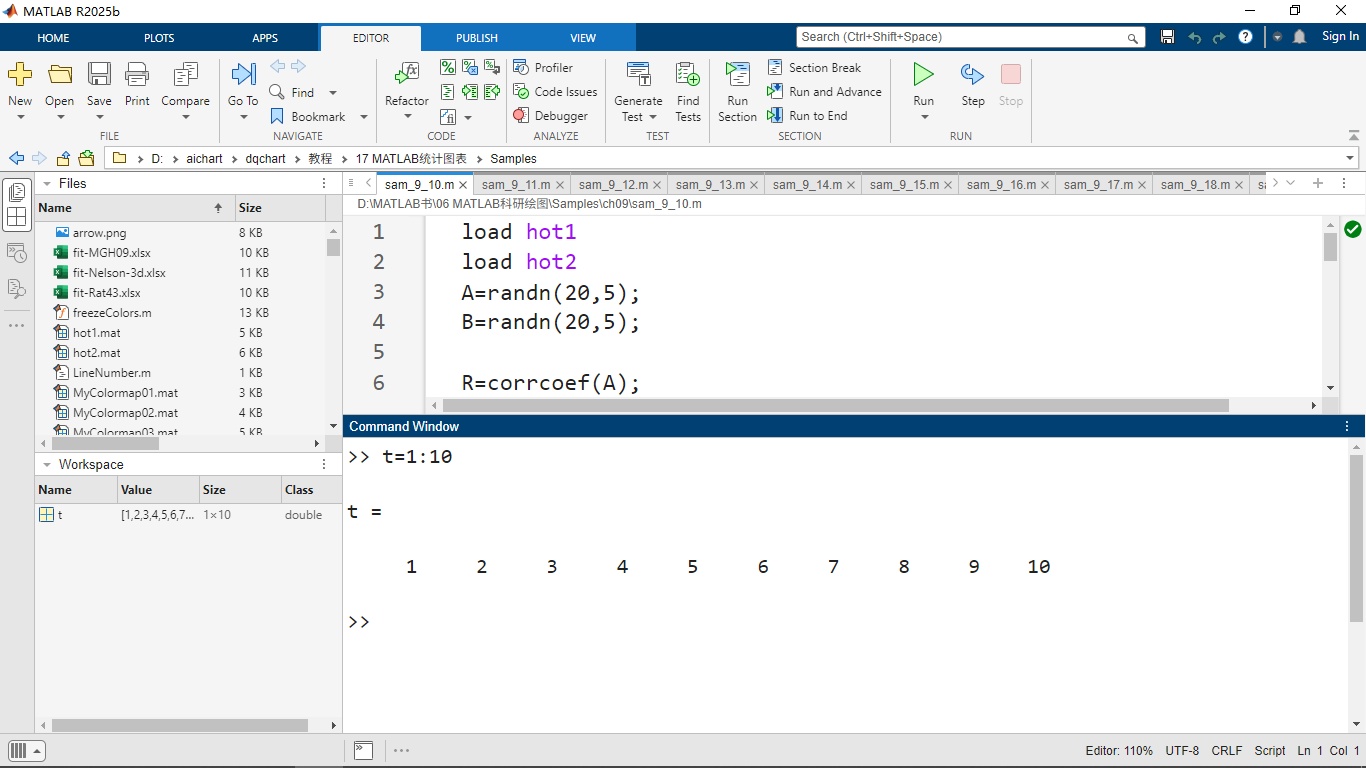
Figure 1-1 MATLAB Desktop
The MATLAB desktop includes the tools listed in Table 1-1. By default, some of them are not displayed. If users prefer the command-line mode, they can use equivalent functions to accomplish the tasks done by the desktop tools.
Table 1-1 MATLAB Desktop Tools
| Desktop Tool | Description |
|---|---|
| Toolbar | Provides visual and convenient operations for common actions |
| Array Editor | View array contents in table form and edit array values |
| Command Window | Run MATLAB functions |
| Current Directory Browser | View files, perform operations like opening, finding, and managing files |
| Editor/Debugger Window | Create, edit, and debug M-files (files containing MATLAB functions) |
| Figure Window | Create, modify, view, and print MATLAB graphics |
| Help Browser | View and search documentation for all MathWorks products |
| Profiler Window | Improve M-file performance with a graphical interface |
| Web Browser | View HTML and MATLAB-related information |
| Workspace Window | View and change contents in the workspace |
Toolbar
In Figure 1-1, the upper part of the interface is the toolbar. The toolbar provides visual and convenient operations for commonly used actions. The following mainly introduces the four commonly used toolbars.
1. "Home" Toolbar
The "Home" toolbar, shown in Figure 1-2, mainly provides convenient operations for files, variables, code, Simulink, environment, and resources.

Figure 1-2 "Home" Toolbar
2. "Plots" Toolbar
The "Plots" toolbar, shown in Figure 1-3, becomes available after selecting variables in the workspace. Clicking a button will automatically add a command to the Command Window and generate the corresponding graph. Clicking the dropdown arrow on the right reveals more graph types.

Figure 1-3 "Plots" Toolbar
3. "Apps" Toolbar
The "Apps" toolbar, shown in Figure 1-4, lists several encapsulated functional applications. These applications provide GUIs (Graphical User Interfaces) for visual interactive operations, allowing users to operate without memorizing commands, making them more convenient.

Figure 1-4 "Apps" Toolbar
4. "Editor" Toolbar
The "Editor" toolbar, shown in Figure 1-5, provides auxiliary operations for file management, navigation, editing, debugging, and running, mainly targeting function and script editors.

Figure 1-5 "Editor" Toolbar
Command Window
The Command Window is one of the main tools for entering data, running MATLAB functions and scripts, and displaying results. Commands can be entered after the prompt.
For example, the code to create a 3x3 matrix A is as follows:
A = [1 2 3; 4 5 6; 7 8 9]After entering the command line and pressing Enter, MATLAB returns the value of matrix A:
A =
     1     2     3
     4     5     6
     7     8     9
When running a function, enter the function and its variables, then press Enter. For example, entering in the command line:
magic(2)MATLAB returns:
ans =
     1     3
     4     2
Tip: Adding a semicolon (;) at the end of a statement prevents the output result from being displayed on the screen. This trick is useful when creating large matrices. For example:
A = magic(100);Adding "!" before an operating system command allows calling tools or other executable programs without exiting MATLAB. For example:
!dirThis calls the DOS dir command. If you want the external program to return to MATLAB after completing the task or exit, add the "&" character at the end of the command line, for example:
!dir &This will display the output in a separate window or run the application in background mode.
Tip: There are some commonly used function keys in the Command Window that can make operations more convenient and faster. The commonly used function keys are shown in Table 1-2.
Table 1-2 Commonly Used Function Keys in the Command Window
| Function Key | Function | Function Key | Function |
|---|---|---|---|
| ↑, Ctrl+P | Recall previous command line | Home, Ctrl+A | Move cursor to start of line |
| ↓, Ctrl+N | Recall next command line | End, Ctrl+E | Move cursor to end of line |
| ←, Ctrl+B | Move cursor left one character | Esc | Clear command line |
| →, Ctrl+F | Move cursor right one character | Del, Ctrl+D | Delete character at cursor |
| Ctrl+← | Move cursor left one word | Backspace | Delete character left of cursor |
| Ctrl+→ | Move cursor right one word | Ctrl+K | Delete to end of line |
Workspace Window
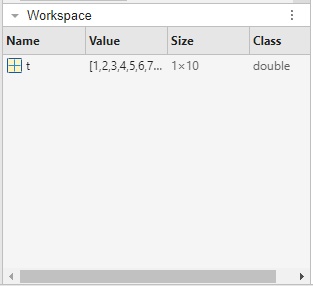
Figure 1-6 Workspace Window
The MATLAB workspace consists of a series of variables, as shown in Figure 1-6. Variables can be added by using functions, running M-files, and loading existing workspaces. For example, if you input:
t = 0:pi/4:2*pi;
y = sin(t);
The workspace includes these two variables y and t, each with 9 values.
The Workspace window can display the name, value, array size, bytes size, and type of each variable. The who function lists all variables in the current workspace, and the whos function lists variable information. For example:
whoYour variables are:
A    ans  t    y
whos
Name    Size     Bytes  Class     Attributes
A       3x3      72     double
ans     1x1       8     double
t       1x9      72     double
y       1x9      72     double
The exist function checks if a specified variable is in the workspace. For example:
exist treturns
ans =
     1
A return value of 1 indicates that variable t exists in the workspace.
When exiting MATLAB, the contents of the workspace are cleared. You can save part or all of the variables in the current workspace to a MAT file, which is a binary file with the extension .mat. You can then load it later when needed.
Clicking the "Save Workspace" button in the "Home" toolbar saves the workspace variable data.
Clicking the "Save Workspace" button in the "Home" toolbar saves the workspace variable data.
Follow these steps to save part of the variables in the current workspace:
Select variables in the Workspace Browser. Hold down the Shift key while clicking variable names to select multiple variables.
Right-click and select "Save As..." from the pop-up shortcut menu to open the "Save As" dialog box.
Specify the save path and file name. MATLAB automatically saves with the .mat extension.
Click the "Save" button.
You can also use the save command to save the workspace. Follow these steps to load variables into the workspace:
Click the "Open" button on the "Home" toolbar to open the "Open" dialog box.
Select the MAT file to load and click the "Open" button. All variables in the file are loaded into the current workspace. If a variable name in the file matches an existing variable name, the existing variable is overwritten.
You can also use the load command to open an existing workspace, for example:
load('matfile')where matfile is the name of the MAT file.
The Array Editor allows you to view and edit one-dimensional or two-dimensional numeric arrays, strings, string cell arrays, and structures in a spreadsheet-like form. Right-click the variable you want to open in the Workspace Browser, click "Open Selection" in the pop-up menu, and a tab named after the variable will appear in the editor area. Double-click that row to open the Array Editor, as shown in Figure 1-7.
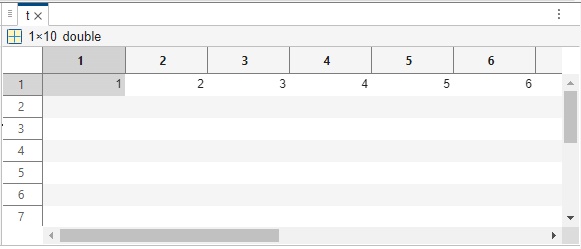
Figure 1-7 Array Editor
Now you can perform operations like copying, cutting, and pasting data just like in Excel. Overall, the advantage of the Array Editor is that it provides a visual way to edit data.
Current Directory Browser
Use the MATLAB Current Directory Browser to search, view, open, find, and change MATLAB paths and files, as shown in Figure 1-8.
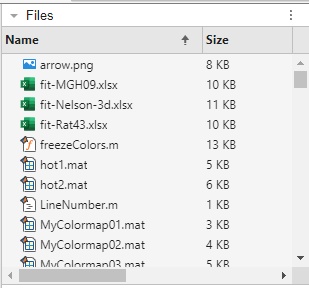
Figure 1-8 Current Directory Browser
The Current Directory Browser can be used to complete the following main tasks:
View and change paths;
Create, rename, copy, and delete paths and files;
Open, run, and view file contents;
Find files and contents within files.
Editor Window
The Editor window is shown in Figure 1-9. In the editor, you can enter, edit, and debug MATLAB scripts and functions. In the content area, different colors are used to represent keywords, comments, strings, etc. In the editor, the first column is the line number. In the second column, you can set breakpoints by clicking where there is a short dash. Debugging editor content is mainly done through the "Editor" toolbar shown in Figure 1-5.
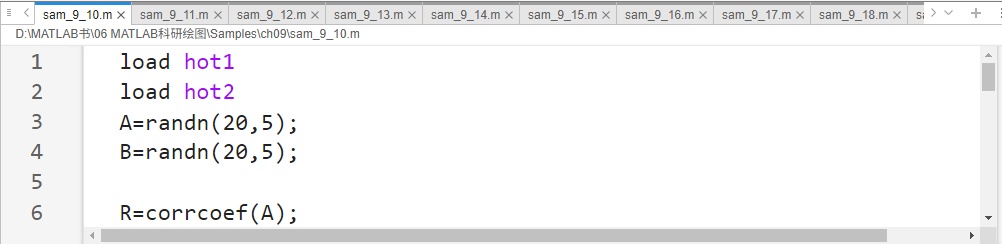
Figure 1-9 Editor Window